Introduction to Mini Cheesecake Cups
When it comes to dessert, mini cheesecake cups really take the cake—pun intended! These delightful treats combine the rich, creamy goodness of traditional cheesecake with the convenience and cuteness of single-serving portions. Perfect for parties, picnics, or just a sweet craving at home, mini cheesecake cups offer a combination of flavors and textures that is hard to resist.
Why Mini Cheesecakes Are the Perfect Dessert
So, what makes mini cheesecakes such a fantastic choice? Here are a few reasons to consider:
-
Portion Control: In a world where we’re often trying to maintain a healthy balance, mini cheesecake cups allow you to indulge without overdoing it. Each cup is just the right size to satisfy your sweet tooth without feeling like you’ve gone overboard.
-
Customizable Flavors: One of the beauties of these little delights is their versatility. You can stick with classic flavors like vanilla or chocolate, or get adventurous with strawberry, matcha, or even unique options like pumpkin spice. The possibilities are endless!
-
No-Bake Options: For those hot summer days when the last thing you want to do is turn on the oven, no-bake versions of these mini treats come to the rescue. They’re easy to prep using ingredients like cream cheese and whipped topping, meaning you can whip them up in advance and chill them in the fridge.
-
Ideal for Celebrations: Whether it’s a birthday bash or a casual get-together among friends, mini cheesecake cups are an impressive yet simple treat to serve. They can be garnished with fresh fruit, drizzled chocolate, or a sprinkle of nuts to elevate their presentation.
-
Great for Meal Prep: If you’re someone who enjoys planning ahead, mini cheesecakes can be made in batches and stored in the fridge for hassle-free sweet treats throughout the week. You might want to check out this meal prep guide for more tips on easy meal solutions.
In summary, mini cheesecake cups are more than just dessert; they embody joy, creativity, and a sprinkle of indulgence, making them the perfect sweet ending to any meal! Whether you’re a seasoned baker or just looking for a fun treat to whip up, these mini delights won’t disappoint.
Ingredients for Mini Cheesecake Cups
Creating delightful mini cheesecake cups is all about selecting the right ingredients. These creamy treats are perfect for any occasion—and they’re surprisingly easy to make!
Essential Ingredients
-
Cream Cheese: 16 ounces, softened. This is the heart of your cheesecake, giving it that rich, creamy texture.
-
Granulated Sugar: 1 cup. Sweetening your cheesecake is crucial; adjust to your taste!
-
Sour Cream: 1/2 cup. Adds a tangy flavor and increases the creaminess.
-
Vanilla Extract: 2 teaspoons. For that warm, inviting aroma.
-
Eggs: 2 large, at room temperature. They help bind everything together, ensuring a silky finish.
-
Graham Crackers: About 1 cup, crushed. These will form your crunchy base, adding texture and a hint of sweetness.
-
Butter: 4 tablespoons, melted. It helps to hold your crust together perfectly.
Flavors and Toppings
Feel free to customize your mini cheesecake cups with different flavors or toppings! Think of fresh fruits like strawberries or blueberries, or perhaps a drizzle of caramel or chocolate sauce. For more ideas, check out Food Network for inspiration.
By gathering these ingredients, you’re ready to embark on a delicious journey into the world of mini cheesecakes. Happy baking!
Step-by-Step Preparation of Mini Cheesecake Cups
When it comes to indulging in a sweet treat, nothing beats a mini cheesecake cup. These delightful desserts are perfect for parties, picnics, or simply as a weeknight treat. Let’s dive into the easy steps to create your very own batch of these irresistible cheesecakes!
Prepare the crust
The crust is the foundation for any great cheesecake, and these mini gems are no exception. To start, gather your ingredients:
- 1 ½ cups of graham cracker crumbs
- ⅓ cup of granulated sugar
- ½ cup of unsalted butter, melted
-
Mix the ingredients: In a medium mixing bowl, combine the graham cracker crumbs, sugar, and melted butter. Stir until everything is well incorporated and resembles wet sand.
-
Distribute the mixture: Next, line a muffin tin with cupcake liners or grease it well. Evenly distribute about 2 tablespoons of the crust mixture into each cup, pressing down firmly with the back of a spoon to create a solid base.
-
Bake for added flavor: Preheat your oven to 350°F (175°C) and bake the crusts for about 5-7 minutes. This step enhances the flavors by toasting the crumbs slightly. Let them cool while you prepare the filling.
Make the cheesecake filling
Now that your crust is set, it’s time to whip up the creamy cheesecake filling. Here’s what you’ll need:
- 16 oz of cream cheese, softened
- ½ cup of granulated sugar
- 1 tsp of vanilla extract
- 2 large eggs
-
Beat the cream cheese: In a large mixing bowl, beat the softened cream cheese using an electric mixer until it’s smooth. It’s crucial to start with softened cream cheese to avoid lumps.
-
Add the sugar and vanilla: Gradually mix in the sugar and vanilla extract until combined.
-
Incorporate the eggs: Add the eggs one at a time, mixing well after each addition. This will ensure a smooth and fluffy texture in your mini cheesecake cups.
Fill the muffin cups
With both your crust and filling ready, it’s time to assemble these delightful treats!
-
Fill the cups: Using a spoon or a piping bag, carefully fill each crust with the cheesecake filling. Leave a little room at the top, as the filling may puff up slightly during baking.
-
Optional toppings: If you like, you can sprinkle some fresh fruit on top or add a small dollop of jam for an added burst of flavor. Experimenting with toppings can make your cheesecakes even more fun!
Bake the mini cheesecakes
-
Transfer to the oven: Place your filled muffin tin in the preheated oven. Bake for 15-18 minutes, or until the edges are firm but the center still has a slight jiggle.
-
Let them cool: After baking, remove the tin from the oven and allow the cheesecakes to cool in the muffin tin for about 10 minutes before transferring them to a wire rack.
Chill and serve
Now for the most challenging part: waiting! To achieve that perfect cheesecake texture, chilling is essential.
-
Refrigerate: Cover the mini cheesecake cups with plastic wrap and refrigerate for at least 2 hours or overnight for best results. The chilling process helps the flavors meld wonderfully.
-
Serve: Once chilled, your mini cheesecake cups are ready to be served! Remove the cupcake liners and arrange them on a serving platter. They make a beautiful presentation and are sure to impress your guests.
And there you have it—a delightful step-by-step guide to preparing your very own mini cheesecake cups. These delectable desserts are versatile, allowing you to add any unique twist you can think of. The next time you need a sweet treat, whip up a batch, and don’t forget to share the joy with friends or family! For more delicious recipe ideas, check out sites like Bon Appétit and Food Network for inspiration.

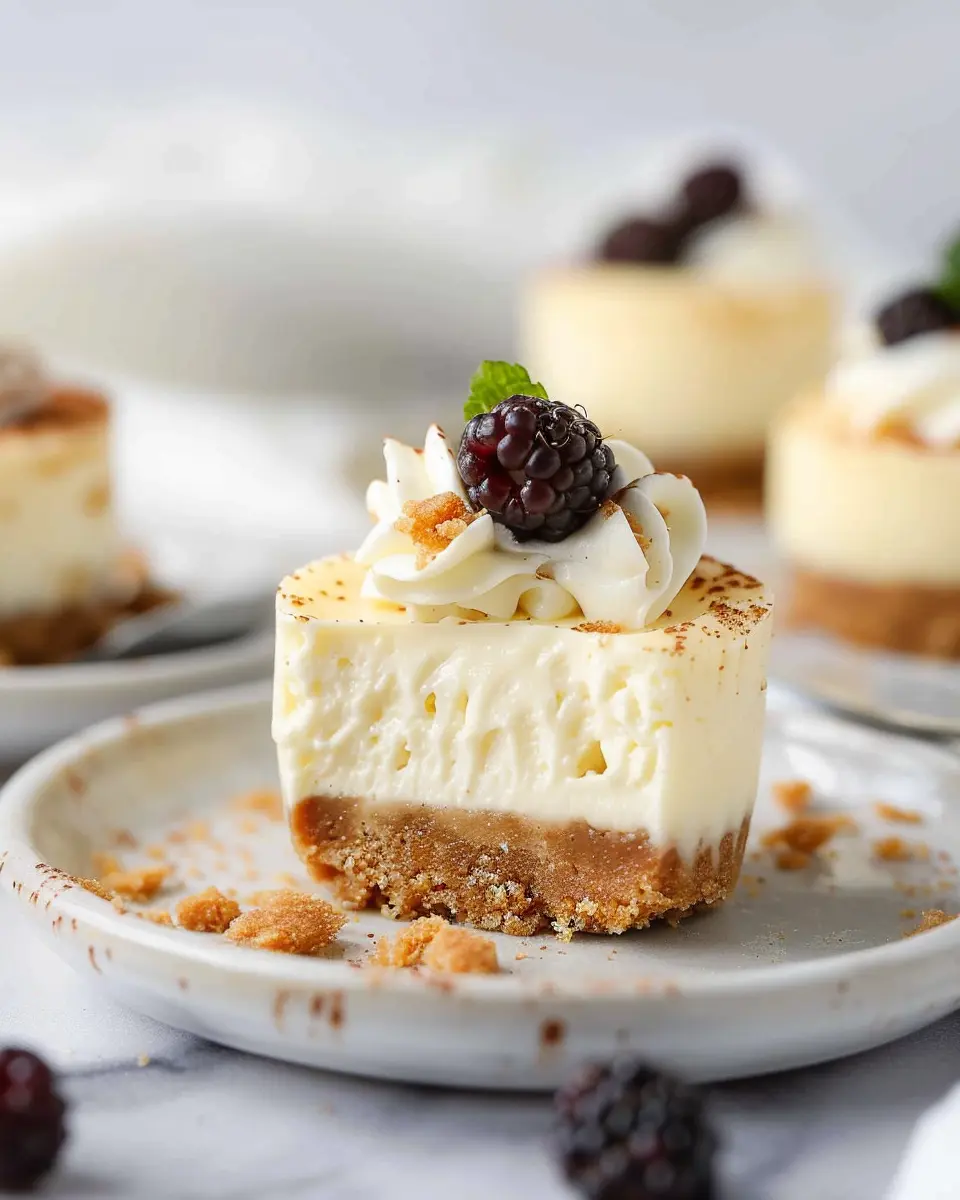
Variations on Mini Cheesecake Cups
When it comes to mini cheesecake cups, the possibilities are endless! These delightful treats can easily be customized to suit your taste buds or the occasion. Here are two popular variations that will surely impress your friends and family.
Indulgent Chocolate Mini Cheesecakes
If you’re a chocolate lover, these mini cheesecake cups are calling your name. Start by incorporating melted chocolate into the cream cheese mixture for a rich, velvety texture. For an added layer of flavor, consider these tips:
- Use dark chocolate for a more intense taste or milk chocolate for a sweeter touch.
- Top with chocolate shavings or drizzle with chocolate ganache for that extra flair.
- Add a sprinkle of sea salt to enhance the chocolate flavor and create a beautiful contrast.
This decadent treat is perfect for birthday parties or any celebration where you want to impress guests. And did you know that dark chocolate also offers health benefits? It’s rich in antioxidants and can improve heart health when enjoyed in moderation. Learn more about the benefits of chocolate here.
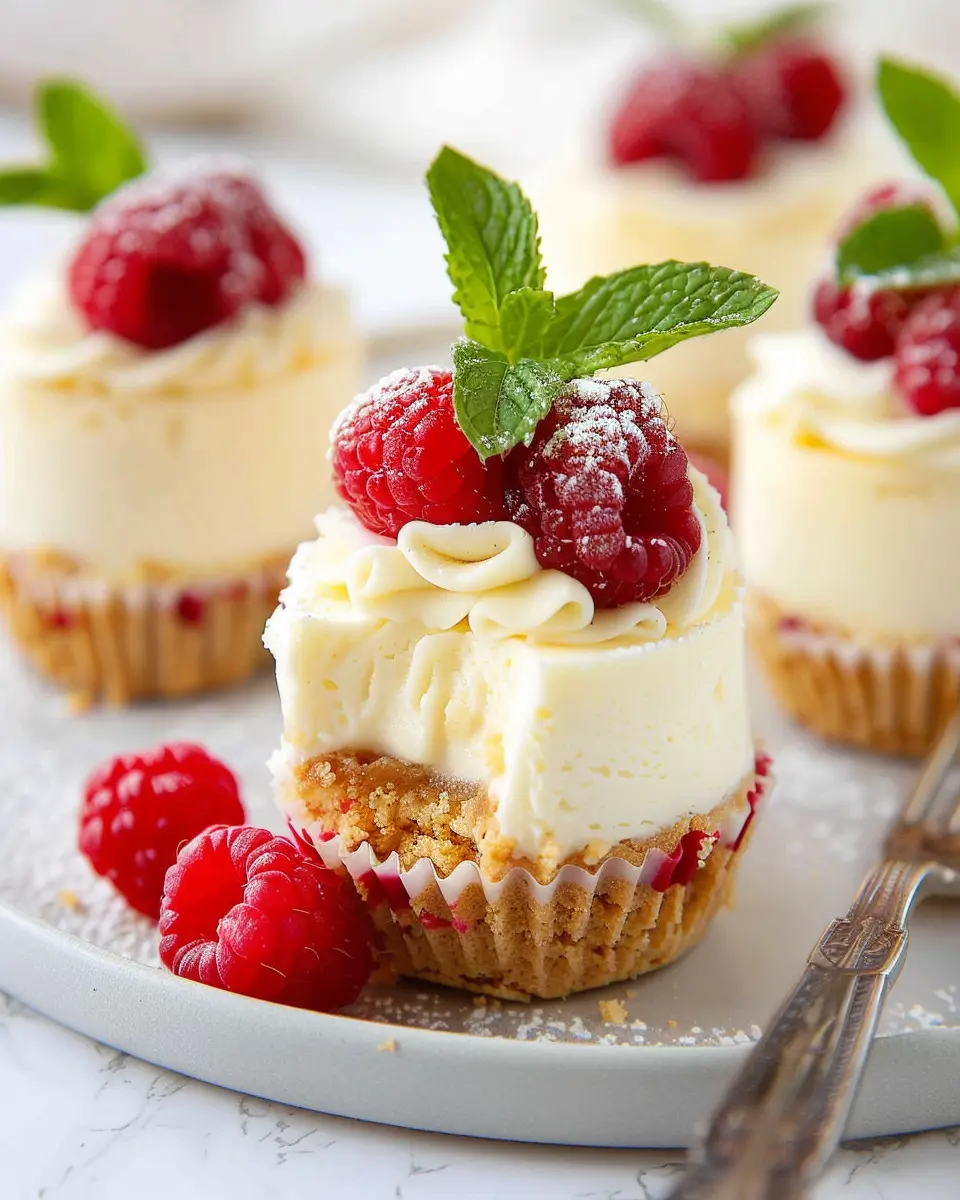
Fresh Fruit-Topped Mini Cheesecakes
For a refreshing twist, consider topping your mini cheesecake cups with fresh fruit! This variation adds a burst of color and flavor that complements the creamy cheesecake wonderfully. Here’s how to do it:
- Choose seasonal fruits like strawberries, raspberries, or blueberries for that fresh taste.
- For a fun twist, make a homemade fruit compote by simmering your chosen fruit with a bit of sugar until it thickens, and drizzle it over the cheesecake.
- Garnish with mint leaves to elevate the presentation.
These bright, fruity delights are a fantastic option for summer events, bridal showers, or even casual gatherings. Plus, they add a nutritious element, as fruits are packed with vitamins and antioxidants.
By exploring these variations, your mini cheesecake cups will never be bland or boring. Embrace your creativity and make every bite a delicious experience!
Cooking Tips and Notes for Mini Cheesecake Cups
Creating delightful mini cheesecake cups is both fun and rewarding! Here are some essential tips to ensure your treats come out perfectly every time.
Choose the Right Ingredients
Using high-quality ingredients makes a significant difference. Opt for cream cheese with full fat for that rich, creamy texture. Don’t skimp on the vanilla extract — pure vanilla truly elevates the flavor!
Prepare Your Cups
Using a cupcake tin lined with paper liners is essential for easy removal. Lightly spraying the liners with cooking spray can help the cheesecakes glide out smoothly.
Chill Time is Key
Patience pays off! Allow your mini cheesecake cups to chill for at least four hours before serving. This time helps them set properly and enhances their flavor.
Flavor Variations
Want to get creative? Consider adding fruit purees, chocolate chips, or even a swirl of peanut butter for added flair. Check out resources like The Kitchn for fun twist ideas!
By keeping it simple yet effective, you’ll impress friends and family with these irresistible mini cheesecake cups. Happy baking!
Creative Ways to Serve Mini Cheesecake Cups
When it comes to serving mini cheesecake cups, the presentation is just as important as the taste. Here are some delightful serving suggestions that will impress your guests and keep their taste buds tingling.
Classic Toppings
Elevate your mini cheesecake cups by adding an array of toppings. Some popular choices include:
- Fresh Berries: Strawberries, blueberries, and raspberries add a pop of color and freshness.
- Chocolate Drizzle: A simple drizzle of melted dark or white chocolate can create a decadent touch.
- Caramel Sauce: Consider a rich caramel sauce for a sweet contrast.
- Whipped Cream: A dollop of freshly whipped cream can bring a lightness that complements the creamy texture.
Elevated Pairings
For a fun pairing, try serving your mini cheesecake cups alongside a refreshing beverage, like sparkling water infused with citrus or herbal tea. This adds a refreshing element that balances the richness of the cheesecake.
Creative Serving Style
Consider presenting your mini cheesecakes in unique ways. Here are some ideas:
- In Jars: Serve the cups in mason jars for a rustic touch that guests will love.
- On a Platter: Arrange the cups on a beautiful platter to make a stunning centerpiece.
These suggestions not only enhance the look of your dessert but also make it easier for guests to indulge. Check out this guideline on dessert plating for more inspiration. Bon appétit!
Time Breakdown for Mini Cheesecake Cups
Understanding the time needed to create your mini cheesecake cups can make the baking process smoother and more enjoyable. Here’s a quick breakdown:
Preparation Time
You’ll want to set aside about 15–20 minutes for prepping your ingredients and assembling the crust and cheesecake filling. This step is essential for ensuring everything is ready to whip together seamlessly.
Baking Time
The baking process typically takes around 15 minutes in the oven. Keep an eye on your mini cheesecake cups for that perfect golden hue, which indicates they’re ready to come out.
Cooling Time
Once baked, allow your cheesecakes to cool for about 30 minutes before transferring them to the refrigerator. Chilling them for at least 4 hours, or overnight if you can wait, will help them set properly, enhancing the flavor and texture.
With the right timing, you’ll create delicious mini cheesecake cups that are sure to impress your friends! For more tips on perfecting your cheesecakes, you can check out resources like The Cheesecake Factory for inspiration. Happy baking!
Nutritional Facts for Mini Cheesecake Cups
When indulging in mini cheesecake cups, it’s important to understand their nutritional content. Here’s a breakdown of what you can expect:
Calories
A single mini cheesecake cup typically contains around 150-200 calories, making them a delightful treat without completely derailing your healthy eating goals.
Protein
Each serving provides about 3-5 grams of protein, thanks to the cream cheese and any added Greek yogurt. This protein boost can help keep you feeling satisfied longer.
Sugar
The sugar content in mini cheesecake cups can vary, but generally, they contain about 10-15 grams of sugar. Opting for natural sweeteners or reducing added sugar can make them even healthier.
For more comprehensive insights into nutritional values, websites like NutritionData and MyFitnessPal offer extensive databases to track your daily intake and make informed choices.
FAQs about Mini Cheesecake Cups
Can I make these mini cheesecakes ahead of time?
Absolutely! Mini cheesecake cups are perfect for prepping in advance. You can make them a day or two ahead and keep them refrigerated. Just ensure you allow them some time to set in the fridge after baking. If you’re feeling creative, consider adding toppings right before serving to keep everything fresh and visually appealing.
What’s the best way to store mini cheesecakes?
To store your delectable mini cheesecake cups, follow these simple tips:
- Refrigerate: If you plan to consume them within a few days, just place them in an airtight container in the fridge.
- Freeze: For longer storage, you can freeze them! Wrap each cup tightly in plastic wrap and then place them in a freezer-safe container. They can last up to three months.
When you’re ready to enjoy, just let them thaw in the refrigerator overnight.
Can I use low-fat cream cheese or other substitutes?
Certainly! If you prefer a lighter option, low-fat cream cheese works surprisingly well in mini cheesecake cups. You can also explore alternatives like Greek yogurt or silken tofu for a dairy-free twist. Just keep in mind that these substitutes may slightly alter the texture and flavor, so a bit of experimentation is key.
Curious to dive deeper into alternative ingredients? Check out this resource on dairy substitutes for more ideas.
Feel free to reach out if you have more questions. Happy baking!
Conclusion on Mini Cheesecake Cups
In wrapping up our delightful journey into the world of mini cheesecake cups, these charming little desserts are more than just visually appealing — they are perfect for any occasion. Whether you’re hosting a casual gathering or indulging by yourself, these bite-sized treats allow you to enjoy the rich flavors of cheesecake without the commitment of a full slice.
Experiment with different toppings — think fresh berries, chocolate sauce, or even a sprinkle of crushed nuts. They not only elevate the taste but also add an attractive touch. Plus, they can be made in advance, saving you time for entertaining guests or pursuing your passions. You can check out Nerdy Mamas for inspiration on variations of cheesecake flavors to explore further! So why not whip up a batch and share the love of these versatile desserts?
PrintMini Cheesecake Cups: Easy, Indulgent Treats for Any Occasion

These Mini Cheesecake Cups are the perfect balance of creamy and sweet, making them an indulgent treat for any occasion.
- Prep Time: 15 minutes
- Cook Time: 20 minutes
- Total Time: 2 hours 35 minutes
- Yield: 12 servings 1x
- Category: Dessert
- Method: Baked
- Cuisine: American
- Diet: Vegetarian
Ingredients
- 1 cup graham cracker crumbs
- 2 tablespoons sugar
- 1/2 cup unsalted butter, melted
- 16 ounces cream cheese, softened
- 3/4 cup sugar
- 1 teaspoon vanilla extract
- 2 large eggs
- 1/2 cup sour cream
Instructions
- Preheat the oven to 325°F (160°C) and line a muffin tin with cupcake liners.
- In a bowl, mix together the graham cracker crumbs, sugar, and melted butter until combined.
- Press the mixture into the bottom of each cupcake liner to form the crust.
- In another bowl, beat the cream cheese and sugar until smooth. Add the vanilla and mix well.
- Add the eggs one at a time, mixing well after each addition, then mix in the sour cream.
- Pour the cheesecake filling over the crust in each liner.
- Bake for 18-20 minutes, or until the centers are set.
- Allow to cool before refrigerating for at least 2 hours before serving.
Notes
- For a flavored cheesecake, add lemon zest or chocolate chips to the mixture.
- Serve with a fruit topping for extra flavor.
Nutrition
- Serving Size: 1 mini cheesecake cup
- Calories: 210
- Sugar: 10g
- Sodium: 180mg
- Fat: 12g
- Saturated Fat: 7g
- Unsaturated Fat: 4g
- Trans Fat: 0g
- Carbohydrates: 24g
- Fiber: 1g
- Protein: 3g
- Cholesterol: 40mg
Keywords: Mini Cheesecake Cups, Cheesecake, Dessert, Easy Recipe